Fit Forever with Kathy!

Posts in the exercise category

The YOU-CAN-DO-IT SLEEK ARMS LEAN LEGS FIRM BUTT Exercise

by Kathy Smith

Screenshot 2015-01-05 13.38.14

A few weeks ago, I stepped into “THE BOX,” ready to conquer a Crossfit workout here in Park City. The alternative equipment and seemingly tire-sized weights were intimidating, but after 20 minutes of pushing myself to my max, my endorphins were flowing and I was hooked and ready for my next Crossfit workout.

Here’s a fitness truth: If you do the same workout over and over, you won’t get results. Whenever I change up my workout, I notice the change in my body. I can already tell the difference in the hard-to-reach muscles of my back, shoulders, abs and my entire lower body. And when it comes to your metabolism, you have to change it up to fire it up.

So, I’m challenging you, right here, right now, to try my at-home bootcamp-style workout (no drill sergeant required). And while the workout is only around 20 minutes, it will still pack an incredible punch.This workout is designed for ANY fitness level. If you find the pace is a little too much for your body, take it down a notch or two. I promise just trying it will give you a self confidence high that will have you coming back for more.

And the best part? No excuses and zero intimidation factor. This versatile workout requires only a few feet of space, and a set of dumbbells, so your at-home gym can be a small space in your living room or bedroom.

Let’s get started!

Here’s how it works: 

  • This workout is called 25′s.
  • There’s 5 moves – do 25 reps of each. For the leg exercises, make sure you do 25 reps on each leg.
  • Aim to complete the routine in less than 20 mins!
  • Do this workout 3 times a week.

And the best part? No excuses and zero intimidation factor. This versatile workout requires no equipment and only a few feet of space, so your at-home gym can be a small space in your living room, a hotel room, a park, or even the beach.

Let’s get started!

Forearm-Plank-With-Swivel

1. Forearm Plank With Swivel

How to do it:

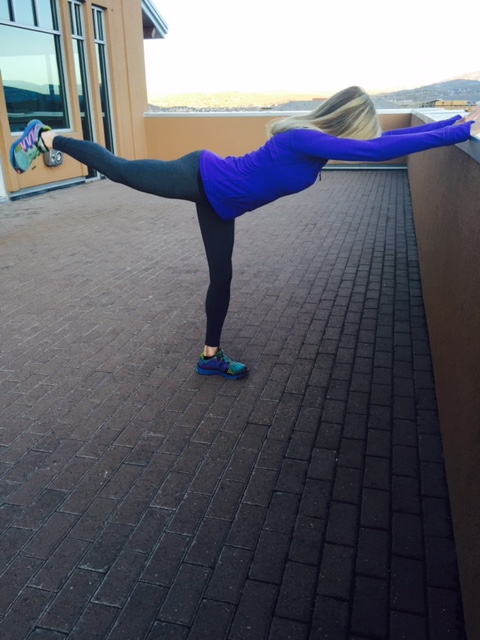
  • Starting in plank position, lift your right leg off the floor, keeping the hips square and squeezing the right glute as you extend the leg.
  • Next, engage your obliques as you bend the right leg and bring the right knee just outside the right elbow.
  • Then, swivel the right leg underneath your torso and toward the left elbow, still keeping the hips square, shoulders back and down and neck long.
  • Do 5 full repetitions like this, and then push back into child’s pose, and repeat on the other leg.

Beginners:

  • Try performing the movement on your knees instead of in full-plank position. You won’t have full range of motion, of course, but this will give you some good practice as you build your core strength.
lunge-with-tricep-kickback

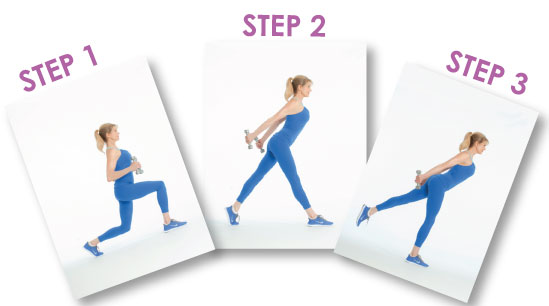
2. Rear Dip Lunge With Tricep Kickback

How to do it:

  • Holding a dumbbell in each hand, step your left foot directly behind you, taking a wide stance, and bend your legs, lowering your torso down into a lunge. Be sure and maintain that core stability to prevent injury.
  • While in lunge position, keep your shoulders over your hips, back knee slightly bent, front knee in alignment with your front toes, shoulders back and down.
  • Feel your weight in your right (front) heel as you push yourself to standing.
  • As you return to standing, do a tricep kickback: Reach your arms back behind you and extend, feeling a squeeze in the tricep.

Beginners:

  • Practice the lunge and tricep kickback movements separately and without weights at first.

side-lunge-with-bicep-curl

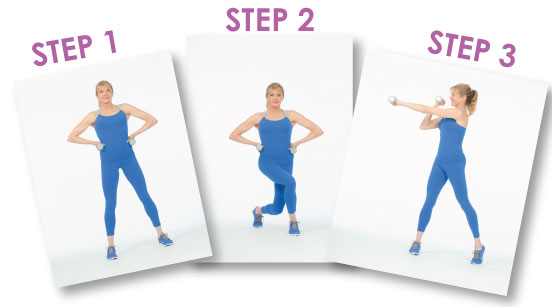
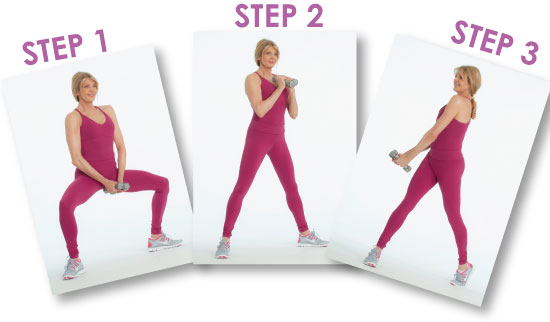
3. Side Lunge With Bicep Curl

How to do it:

  • Stand with dumbbells in each hand in hammerhead position, with palms facing each other.
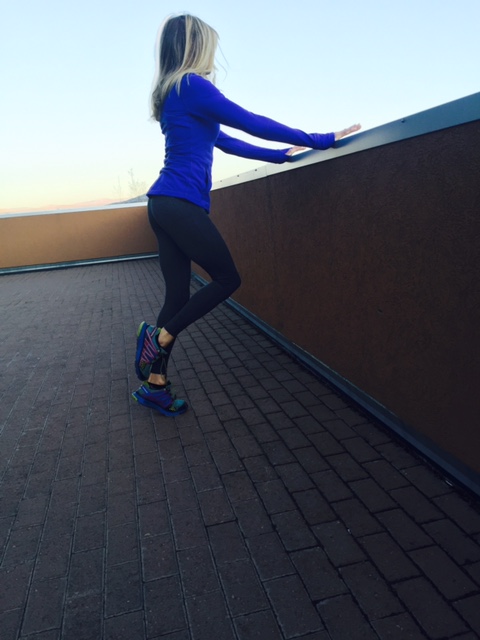
  • Step out to the right side, with a wide stance. Bend the right leg and lower your hips down as you keep the left leg straight out to the side, feeling a slight stretch in the left inner thigh.
  • Pressing off the right foot, keeping your core engaged, push yourself back up to standing.
  • As you return to standing, curl the weights up toward your shoulders, squeezing the muscles on the front of the arms for a bicep curl.

Beginners:

  • Only take a stance that’s comfortable for you – a wide side lunge can be challenging when you’re just starting out.
weighted-bridge

4. Weighted Bridge

How to do it:

  1. Lie on your back with knees bent.
  2. Hold a light to medium weight on the crease between the leg and the hips.
  3. Lift your hips off the floor. Lift your right leg off the floor and then lift and lower the hips 15 times.
  4. Repeat with your left leg off the floor.
burpee

5. Burpees

How to do it:

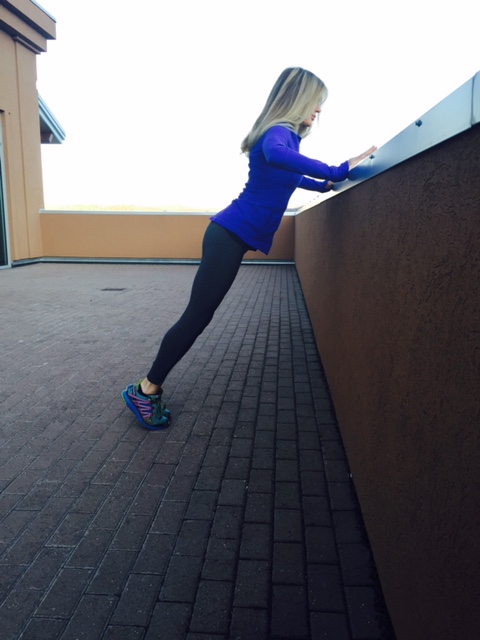
  • Squat down to rest both hands on the floor, similar to the Mountain Climber move. But instead of lunging one leg back behind you, jump both legs at the same time into a plank position.
  • Return to standing, and reach up to the sky.

Beginners:

  • Even though this is a dynamic, full-body movement that challenges both the legs and arms, focus on engaging the core throughout the exercise. Remember to use your lower abdominals to pull in the knees as you jump your legs forward again.
  • Make sure you’re initiating the move from the core as you lift your hips up and hop both legs back to standing position

Kathy

By Collage Video | | exercise, fitness, goals, Kathy Smith, practice, Weekly Blog, Wellness | 0 comments | Read more

The #1 Fat-Burning Trick Your Walk Is Missing

by Kathy Smith

the-1-fat-burnign-trick-your-walk-is-missing

Whether you want to torch calories, boost energy levels, or shed some extra weight for swimsuit season, walking is the perfect workout for you. But if you want to torch massive amounts of calories, your walk NEEDS to include periodization

Periodization is a proven, scientific method of training that elite athletes use in order to “peak” just before big events.

In simple terms, periodization is a valuable tool that can help you get the most out of your exercise program especially if you’ve hit a “plateau” — the place where though you continue to work out, you stop seeing progress. Periodization works by varying one or more of the three key aspects of your workout — length, activity and intensity. By changing what you ask your body to do, periodization challenges you so you keep making fitness progress.

Think of periodization as your personal training secret. You can apply the first two concepts of periodization (length and intensity) to most aerobic activities by simply adapting the following walking guidelines to the activity of your choice.

Changing the aerobic activity itself is also a form of periodization and it now referred to as cross-training. It too can lift you off of a plateau. I’ve used this technique over the years when I want to increase my fitness level, break the monotony of doing the same routine, and get off a plateau. Remember, you can use this periodization plan with any aerobic activity.

Let’s get started with a 30-minute fat-burning walk for aerobic activity. 

30-Minute Fat-Burning Walk
FAT-BURNING-WALKING-WORKOUT
  • 5 minute Warm-Up Pace
  • 3 minute Aerobic Interval
  • 3 minute Recovery Interval - Catch your breath and get ready for the next interval!
  • 3 minute Aerobic Interval
  • 3 minute Recovery Interval
  • 1 minute Anaerobic Interval - For one minute, walk as fast as you possibly can! On a scale from 1-10, you should be pushing yourself from a 7-9.
  • 3 minute Recovery Interval
  • 1 minute Anaerobic Interval 
  • 3 minute Recovery Interval
  • 1 minute Anaerobic Interval
  • 3 minute Recovery Interval
  • 5 minutes Cool-Down Pace

Purchase Kathy Smith's Fat Burning Walking Workout HERE.

This workout is designed as an advanced program to increase your aerobic fitness level as you go faster. And of course, it burns a ton of calories! This calorie-torcher is a reasonably strenuous program, for even the fittest people, because it uses ANAEROBIC INTERVALS to challenge you. Anaerobic intervals are short, intense exercise periods that really push you to the next level of fitness.

The word “aerobic” means “with oxygen”. Aerobic exercises are those that use continuous motion for an extended period of time such as jogging, cycling, walking, etc.

The word “anaerobic” means “without sufficient oxygen”. Anaerobic exercises are more intense but of a shorter duration. They quickly push you past your aerobic threshold leaving you breathless. Some examples are weight training, sprinting, or short but intense periods of typical aerobic activities.

Begin your Fat Burning Walk with a 5-10 minute warm-up, building to a steady-state pace. Then do two cycles of AEROBIC INTERVALS — three minutes of pushing slightly more than your steady-state, followed by three minutes of recovery (at a moderate level).

Now you’re ready for an ANAEROBIC INTERVAL: Walk as fast as you possibly can for one minute. On your perceived exertion scale, you’ll get up to the 7-9 level during the fast part of the interval. Then drop down to a brisk, moderate pace fot he three-minute RECOVERY INTERVAL.

By design, the one-minute anaerobic interval should pus you to your maximum effort. No holding back!

The three-minute recovery allows you to catch your breath a bit..and get ready for your next interval.

Make it a goal to do three to five cycles of these anaerobic intervals. Finish wit ha cool down at a steady pace for the remainder of your workout time.

Kathy

By Collage Video | | exercise, fitness, goals, Kathy Smith, Weekly Blog, Wellness | 0 comments | Read more

1 Missing Link to Flat, Firm, and Fabulous Abs

by Kathy Smith

There’s more to killer abs than just exercise and abdominal crunches. Turns out that there’s a direct relationship between a healthy digestive system and your overall look, too. Not only does what you eat affect whether or not you pack on pounds, but what you eat can also impact how your digestive system works, how it processes and eliminates waste effectively, as well as how it helps support the surrounding muscles and tissue.Don’t you love when you notice the results from working out and eating healthier? You catch a glimpse of new definition in your arms and your legs and all the effort is worth it. But if you’re still noticing some tummy jiggle, you’re not alone. And one potential solution might surprise you.

Abs and an Upset Stomach

Gas, cramps, bloating, general aches and pains, and even a distended abdomen are common complaints. What’s happening inside your body is gut inflammation from food allergies and food intolerance.

Here’s that potential solution I mentioned: The greater the level of inflammation in your digestive system, the greater the likelihood that your abdominal muscles will not respond to exercise.

Why?

Well, when you’ve got a stomach that’s inflamed, giving you pain, that inflammation can affect the abdominal muscles that are supposed to be stabilizing your core. In other words, those pain impulses that come from your digestive system can result in weakness and more pain in those regions of the abdominal wall. And when those muscles become weak or disabled due to your (sick) digestive system, they aren’t much help to you and they won’t respond very well to your attempts to work them.

Just about any problem you might have in your digestive tract is called a “digestive disorder” – indigestion, heartburn, or simply an upset stomach. Highly processed, poor-quality foods and fast food don’t make the situation any better.

A Diet That Agrees With Your Core

You know you have to make good choices when it comes to food, beverage, and getting proper exercise. It can be a challenge to eat well and exercise for purposes of losing or maintaining your ideal weight. But I bet you’ve never thought about how your digestive system can change the way your core responds to exercise.

The goal is to get the internal workings of your core to be in harmony with the rest of your body so when you perform a core workout, and work those abs, you see the rewards in a tighter, flatter belly. And you can accomplish that with some slight changes to your diet.

The Cleveland Clinic offers the following suggestions:

• Eat at least 7 servings of fruit and vegetables per day.

• Choose whole grains whenever possible.

• Limit consumption of higher fat meats like beef, pork, lamb, and processed meats.

• Cook by steaming, poaching, stewing, braising and boiling more often. Avoid fried foods.

• Spicy foods, alcohol, soft drinks (including zero-calorie soft drinks), corn and dairy products are the foods that the majority of people have problems with. Review your intake of these items and completely eliminate them to determine if they could be causing digestion problems.

• Drink lots of water! Dehydration leads to a host of problems. Being fully loaded with water will also allow you to get the most of your workout.

And of course, don’t forget to keep up with your exercise and abdominal work routine. The road to a flat belly entails a combination of efforts. You’ll not only look better, but you’ll feel better, too!

Try this 5-minute crunch-free ab routine from my Flat Abs over 40 Program as a way to maintain your workout routine while you take a closer look at your digestive health:

Purchase Kathy Smith's Total Body Turnaround complete workout (clip above) HERE.

Kathy

By Collage Video | | Abs, exercise, fitness, goals, Kathy Smith, tips, Weekly Blog, Wellness | 0 comments | Read more

Walk Off Belly Fat Before Breakfast

by Kathy Smith

Supercharge your step and take your ab routine to the next level

walking-animation

How would you like to get rid of belly fat and kick crunches to the curb? For a workout that really trims your midsection, it’s time to get walking. Studies show walking is one of the best ways to banish the belly bulge, in less time than you think. There are four decades of studies on exercise and belly fat that show just 2 1/2 hours of brisk walking a week–only about 20 minutes a day–can shrink your belly by about 1 inch in 4 weeks!

Who doesn’t have time for those kind of results? 

That’s exactly why today I’ll show you how to supercharge your steps with a MUST-WATCH 3-minute waist-whittling walking video.

Although walking is the foundation of this workout, it also includes simple but powerful standing ab moves that will help you blast away belly fat and walk off the pounds. And don’t forget…no more crunches! By incorporating these easy moves into your walking routine, you’ll see an overall tighter core that will also improve balance and coordination.

I’ve seen thousands of women and men use this walking ab routine and melt inches off their waists! Mary uses my walking workouts almost daily, and can hardly describe her incredible transformation. Not only has she supercharged her metabolism, she’s also seeing definition in her midsection where she used to have what she describes as, “nothing but softness before.” Today’s clip gives you a taste of the incredible walking workouts that have helped so many people tone, tighten and fire up their metabolism!

Plus, if you want a workout that’s gentle on your joints, then today’s video is definitely for you. Louise says,“This walking workout is my absolute favorite, because it’s not too hard on my back or knees, but it’s still interesting and fun.”

Purchase Kathy Smith's Power Walk for Weight Loss complete workout (clip above) HERE. 

Kathy

By Collage Video | | Abs, exercise, fitness, goals, Kathy Smith, tips, Weekly Blog, Wellness | 0 comments | Read more

Simple 3-Step Flat-Belly Plan (Yes, Please!)

by Kathy Smith

FineLivingPRSHOTS 009

 Two-piece. Cutouts. Bring it on!

The truth is, no matter what article of clothing you’re aiming to sport this summer, every woman wants to look and feel confident. And when it comes to our midsections, women tend to get shy. In fact, a recent study showed that 72% of women listed their belly as the part of their body they’re most uncomfortable with.

When it comes to abs, it all simmers down to this: the stuff you can pinch (fat) and the stuff you can cinch (muscle) and you can tackle both!

Even if you’re spending time in the gym, using this simple approach will ensure that the fat stores in your waistline will shrink.

The end result? You’ll be on your way to abs you LOVE!

Step 1: To Know Your Abs Is To Love Them

5art_artMLet’s start with the rectus abdomonis. These muscles flow from your ribcage to your pelvis, and those are your crunching muscles (what gives you those 6-pack abs!).The first step to flaunt-able, flat abs is to train the muscles. Your abdominals are made up of three different sets of muscles: the rectus abodminis, obliques, and transverse abdominis.

Then, we have obliques (internal and external). Whenever you do twisting motions, you’re using your obliques!

The last set of muscles is your transverse abdominis. The transverse abdomonis are your posture muscles, and they run across your body. Think of them as your built-in Spanx! Properly trained transverse muscles keeps your belly tightened inward. You use these muscles when you have to squeeze in your tightest pair of jeans without getting pinched!

TRAINING-THE-TRANSVERSE


Look what happens when I’m not engaging my transverse muscles (see photo on right). If I just let my muscles hang out, I get a little belly! Being in this position puts pressure on my lower back, and notice how my poor posture makes me look older and thicker! The trick is to engage your transverse muscles…even when you’re standing! You don’t have to be doing exercises on the floor to be working your abdominals and engaging your transverse muscles gives you an instant confidence boost!


Step 2. Burn off the fat!

We all have two types of fat – subcutaneous, which is underneath your skin, and visceral fat, which is marbled through your organs and muscles. The best way to get rid of both kinds is to do HIIT workouts.

High Intensity Interval Training (HIIT) is a simple concept. After warming up, you push yourself with bursts of high intensity, then pull back the intensity to a steady state. Burst…then pull back, and repeat. This type of training will help burn the fat on your body, including your belly, in time for summer fashions.


Step 3. Hello, Abs!

The only way to burn off belly fat is to get moving! Adding a simple core workout, like the one above, will shrink your waistline and take your workout up a notch!

Incorporating this workout into your daily routine will help you achieve a trimmer waistline to look amazing and feel confident in your summer clothes.

Here’s to your health!

Kathy

The No-Excuse Backyard Workout

by Kathy Smith

This weekend, skip the gym. (Seriously!) Most of us focus on trying to find time for a 30-minute workout, and yet, moving throughout the day is just as important. Don’t get me wrong…the last thing I want to do is discourage anyone from devoting time to exercise.

But what if I told you that you can slim your thighs and cinch your tummy with just a few quick moves in your backyard without any dumbbells? Today, I’ll show you 4 gym-free moves to try next time you step outside.

1. The Daily Warrior

Leg Lift

 Move:

  1. Facing a wall, place your hands at hip level.
  2. Walk your feet back until your body forms a right angle, with the hips directly over the feet, arms straight.
  3. Separate your feet hip-width apart, with the heels directly under each sitting bone.
  4. Separate the hands shoulder-distance apart and plant your knuckles evenly into the wall, pointing the middle finger toward the sky. Firm the outer upper arms and elongate the sides of your body and hips away from the wall. Keep your ears in line with your upper arms. As you reach the sternum forward, take the shoulder blades into the body.
  5. Keep the feet parallel and lift the inner thighs from the inner knees up toward the pelvis. Strongly engage thighs.
  6. Take the tops of the thighs away from the wall to elongate the sides of the body and spine. For stability, firm the sides of the hips to your midline.
  7. Keep your weight even in both hands and lift the right leg a few inches. Flex the foot to connect with the back of the leg.
  8. To make the move more difficult, lift your fingers off the wall.

 2. Wall Turbocharger

Before you even step outside, get a jumpstart on your morning routine by incorporating the Wall Turbocharger into your beauty routine. Instead of leaning on the sink while you brush your teeth, do a turbocharger, and hold it there for 15-60 seconds. Suddenly your morning brush isn’t just about your teeth and gums – now it’s a great leg and glute strengthener, too.

Wall Sit Leg Up

Move:

  • Place your back against a sturdy and flat wall
  • Drop down so that your legs make a 90 degree angle.
  • Slowly lift your right leg straight out so that it is parallel with the floor and hold it there.
  • Hold for 15 seconds

3. Dynamic Pushup

Don’t under-rate this move…it may be a classic, but the Huffington Post recently rated it “The World’s Greatest Exercise.” You don’t need to “drop down and give me 30!” but simply adding pushups into your exercise routine can improve everything from your posture to your balance to your arm, chest, and core strength.

Pushup

Move:

  1. Pressing your hands against a wall or ledge, place your hands under your shoulders, tucking your toes underneath you.
  2. Push up into a plank. Keep your abdominal muscles lifted up toward your spine. Have your hands pointed slightly inward.
  3. Lower yourself toward the wall, trying to achieve about a 90 degree bend in the elbows.
  4. Exhale as you press back up.
  5. Repeat with the left leg lifted.

Repetitions: 12 on each side


4. Power-Ups

Whether you’re inside or out, this move can go with you anywhere! Next time you’re doing the dishes, try some calf raises while you wash, and shoulder blade retractions while you dry. This Power-Up move works the calf muscle, including the soleus, also known as the “second heart,” which is located in the back part of the calf, running down from the knee to the heel. It is used for standing and walking, and is an important muscle in heart health. Recent studies show that people with heart issues rely more on their ankle than their hip when walking, and that they should focus on exercising their calf muscle, targeting the soleus.

Calf Raises

Move:

  1. Stand tall with feet together, holding onto a wall or ledge for balance.
  2. Lift up onto your toes
  3. Slowly lower yourself from your toes to a standing position.

Repetitions: 12 to 15.

Tips:

  • Keep your shoulders back and chest up. Always work on your posture before performing the move.
  • Calf raises can be performed on a stair for more intensity.

Kathy

By Collage Video | | exercise, fitness, goals, Kathy Smith, tips, Weekly Blog | 0 comments | Read more

1 Trick for Losing Weight And Keeping It Off

by Kathy Smith

Here’s shocking news — a recent study shows that it’s especially tough to avoid added calories on the weekends. Susan B. Racette, PhD at Washington University School of Medicine in St. Louis found that not being mindful of your weekend eating patterns adds an additional 9 pounds a year to your waistline! After tracking 48 women, she found that participants naturally ate a few hundred additional calories a day (100-300) on the weekends, comprised of foods higher in fat.

So imagine you are sitting on the couch with your kids watching television this weekend when a bag of salted chips comes your way. You ask yourself, “should I have one?” You know that each chip is only about 10 calories, and that isn’t much. This is when you need to recall previous times you were in the same situation.

Did you eat just one? If you didn’t—and you ate half a bag, which is 600 calories—then the best decision today is to pass the bag to someone else.

I advise anyone who is trying to lose weight (and keep it off) to identify her own eating patterns. Tune in to the foods and eating situations that often trigger overeating or binges. Everyone is different when it comes to trigger foods.

I used to have a problem with chocolate. If it was in my kitchen it didn’t last long. One bite led to two, then three and four. At one point I banished it from my house because there was no chance I could eat it in moderation.

I have learned that it is usually easier to simply say “no” to even one chip or candy. It is much harder to stop a binge when it is in progress. So this weekend, it’s important to consider your past habits.

Rely on your food and fitness tracker

Our bodies and our fitness levels are created by old habits and old patterns. That is why tracking your food intake and exercise activities  is so helpful. Whether it’s digitally through a fitness tracker (like MyFitnessPal, Jawbone or FitBit), or keeping notes in a food journal, staying aware helps you become more in-tune with your habits and patterns.

High-tech gadgets, like Fitbit, that have hit the market in recent years take the guesswork out of your calorie burn and caloric intake, and they allow you to gauge your food-fitness relationship.  From smart phone apps to wristbands devices, and other handy interactive tools, tracking your caloric expenditure, activity levels, and fitness goals is easier than ever. I like trackers because they clearly show how effective an exercise is and often motivate you to take your workout to the next level.

In the hum of daily life, we’re often unaware of how our behavior falls into patterns and how we repeat the same mistakes until we see it recorded. In reviewing my own journal, for instance, I discovered that I have a habit of eating trail mix right from the bag. That can lead me to eat multiple servings. I didn’t realize until I did the math how many calories I was mindlessly consuming. Now I remind myself to measure out one portion so I don’t overeat.

Kathy

By Collage Video | | exercise, fitness, goals, Kathy Smith, tips, Weekly Blog, wellness | 0 comments | Read more

Skip The Gym With These 10 Gym-Free Ways To Burn Calories

by Kathy Smith

This weekend, skip the gym. (Seriously!) Most of us focus on trying to find time for a 30-minute workout, and yet, moving throughout the day is just as important. Don’t get me wrong…the last thing I want to do is discourage anyone from devoting time to exercise. But what if I told you that you can burn calories around the clock without hitting the treadmill? Today, I’ll show you 10 gym-free ways to burn calories all weekend long!

First things first…It’s important to understand that doctors, research journals, even the World Health Organization agree: A sedentary lifestyle may be to blame for a host of illnesses, from fatty liver disease to diabetes, even for people who work out regularly but spend too much time sitting. Sure, we live in a computer-based world, and we can’t always jump up from our desks for a quick jog. But we can do a little more multitasking, and add more physical activity to our schedules on the weekends or when we’re not working. For adding activity to your day, it’s the little stuff that counts.

Try these 10 ways to burn more calories throughout your day without a treadmill:

  1. Fidget! According to a study from the Mayo Clinic, simply tapping your foot during your favorite songs throughout the day can help you burn up to 350 calories.

  2. Stand tall! If you want to slim down and boost your confidence, good posture is the first step. Standing tall projects to the world that you feel good about yourself, and it will help you burn extra calories and can even make you look 10 pounds thinner…not to mention a few years younger!

  3. Go to comedy night! Laughing for 10-15 minutes a day burns an additional 50 calories. It may not sound like a lot, but if you do it every day, that’s 350 calories a week by simply enjoying a good joke.

  4. Clean up! Move your trashcan away from your desk, so instead of a reach-and-toss, you’ve got to go for a short walk to throw things away.

  5. Sit & brush! Instead of leaning on the sink while you brush your teeth, do a wall sit: Standing with your back a couple feet from the wall, bend your knees and lower into a 90-degree angle squat position, and hold it there for 15-60 seconds. Suddenly your morning brush isn’t just about your teeth and gums – now it’s a great leg and glute strengthener, too.

  6. Make showtime your fitness time. When you’re watching TV, make the commercial break your fitness break, alternating lower-body-firming plies with core-strengthening planks.

  7. Visit a friend. Instead of calling a friend or your next door neighbor, take a stroll outside to say “hello” in person.

  8. Aim for 10,000. Set a goal of 10,000 steps a day (it takes around 2,000 steps to walk a mile). Treat yourself to an activity monitor as a fun way to stay on track. I’m eager to trest out Apple Watch’s fitness tracker coming next year, but in the meantime, I’m enjoying trackers like my Fitbit. If you wear a tracker throughout the day, you’ll get an easy read on indicators such as number of steps taken, distance traveled, even calories burned. When you see how close you are to your goal, you’ll be amazed what a great motivator it is to get out for that after-dinner walk.

  9. Go for the incline! Learn to love the stairs, or at least, the calorie burn. A person climbing stairs uses around 10 calories per minute, or 360 calories in just 20 mins.

  10. Walk & talk! For those long-distance loved ones who love to catch up by phone, head out for some fresh air with your cell, and walk and talk. Isn’t it about time we put the “mobile” back into “mobile phone”?

You can tone up and burn calories in a way that’s convenient for you. It just takes a little bit of creativity. You don’t have to dramatically reschedule your day. All you have to do is find new ways to add movement throughout it. Start with these tips, and get creative with your own!

Kathy

By Collage Video | | exercise, fitness, goals, Kathy Smith, Weekly Blog, wellness | 0 comments | Read more

Flatten Your Tummy in 5 Mins a Day

by Kathy Smith

Crunches, crunches, crunches!

What if everything you’ve ever learned about toning your tummy is wrong? 

Studies are continuing to show that the secret  to strengthening your core and tightening your tummy is about doing the right exercises…not spending doing traditional crunches.

In today’s blog, I've developed a science-based ab routine to help you create the abs you want in only 5 minutes a day! I’ll show you the exact exercises to lose fat and inches around your waistline, tone up your abs, and increase your confidence!

Here’s how to do it: Repeat each move for 30 seconds. Repeat twice.


cannonball

Cannonball

What it does:

  • This move is sometimes called the ˙banana,” because of the slightly-curved line your body forms at the start of the exercise. But no matter what you call it, this full-body core-strengthener is a surefire way to fire up the entire abdominal wall.

How to do it:

  • Start lying on your back, with your arms reaching out overhead, legs lifted slightly off the floor, and toes pointed. Even here, at the start of the move, you’re activating core muscles by stretching them out. Keep pressing the lower back into the mat or floor to ensure the back doesn’t arch. If this feels like too much tension on the back, try lifting the legs a little further away from the floor.
  • Imagine that, as you’re stretching the fingers and toes away from each other, the core is a strong magnet working to pull them back in. Using the force of that imaginary magnet, bring the knees in toward the chest. At the same time, reach your arms toward the legs.

Beginners:

  • Start by doing this move just one leg at a time. Resting your left leg on the floor, perform the move as described above using only the right leg. Do 10 repetitions and repeat on the left side.

Advanced:

  • At the top of the move, when you’re in ˙cannonball” position, wrap your arms around the shins. The objective is to find your balance point. To do that, you need to strongly engage your core muscles when you hit the top of the movement. Coordinating the arms and legs to hit that balance point is the challenge. 

 Ceiling Stap

ceiling-stamp

Here’s how to do it:

  • Lying on your back, squeeze your abdominals and lift your legs off the floor. Extend them up straight, feet facing the ceiling.
  • With your hands on the floor for balance, use your lower abdominal strength to push your feet up 1-2 inches toward the ceiling (meaning your hips come 1-2 inches further away from the floor simultaneously). It’s a quick movement, almost a ˙pulse,” as if you’re stamping the ceiling with the bottom of your feet (hence the title).

Forearm Plank With Swivel

Forearm-Plank-With-Swivel

  1. Start in plank position, but this time, rest on your elbows instead of your hands. Be sure to keep the shoulders depressed back and down and the neck nice and long throughout the movement.
  2. Keeping your abs engaged, slowly swivel the hips underneath you to the right. Feel your obliques driving this motion as you swivel to the other side with a slow, controlled motion.

Kathy


5 Sneaky Ways To Tighten Your Backside

Put your rear into high gear, and work your way towards a “Brazilian Butt!” Instead of wishing those extra pounds away, now you can tighten and tone your backside with  5 sneaky tricks designed to work the muscles from every angle to give you the best lower-body ever!

Trick #1: Go Deep in Your Lunges!

When doing a lunge, lower your body until your knees are at a 90 degree angle. For increased effectiveness in your lunges, also try out these four tips:

  • Keep your shoulders over your hips
  • Slightly bend your back knee
  • Keep your front knee in alignment with your front toes
  • Feel your weight in your front heel as you push yourself to standing

Practice your 90 degree angle with this move: Lunge With Tricep Kickback

Kathy Smith Lunge with Tricep Kickback

What it does:

  • This version of the lunge is an excellent sculptor for the glutes, quadriceps, hamstrings, triceps and core. This is a true functional move because it combines so many muscle groups in one movement.

How to do it:

  • Holding a dumbbell in each hand, step your left foot directly behind you, taking a wide stance, and bend your legs, lowering your torso down into a lunge. Be sure and maintain that core stability to prevent injury.
  • While in lunge position, keep your shoulders over your hips, back knee slightly bent, front knee in alignment with your front toes, shoulders back and down.
  • Feel your weight in your right (front) heel as you push yourself to standing.
  • As you return to standing, do a tricep kickback: Reach your arms back behind you and extend, feeling a squeeze in the tricep.

Trick #2: Be Fit For A Royal With The Curtsy

There’s nothing old-fashioned about this curtsy! The curtsy squat is one of my go-to moves because it targets the quads and outer thighs. Try the curtsy squat below to take the glute-and-leg toning action of a squat while adding a core balance challenge that sculpts the shoulders and obliques.

Kathy Smith's Curtsy Squat With Cross-Punch

How to do it:

  • Rest dumbbells on your hips as you place your left foot behind you. Instead of stepping directly back, the left foot should move diagonally back, with the back knee bending down directly outside the right foot.
  • Fire up the core muscles as you squat down with the right leg, feeling the emphasis on your right glute (weight placed firmly in the right heel) as the left foot lightly supports you.
  • As you return to standing, bring the left foot forward, landing with a wide stance.
  • Punch the right hand across your body, toward the left wall, allowing your right foot to rotate as your torso twists to the left, engaging your right glute.

Beginners:

  • Remember, it’s best to master the form of the exercise before adding the resistance challenge of dumbbells.

Advanced:

  • Keep the majority of your weight in the front foot, especially the heel, and use the back foot mainly for balance.

Trick #3: Go Wide!

To tighten your backside, squats are key! Switch up your routine by changing the width of of your squat to a wider stance. This simple change is an all-around lower body tightener, working the glutes, hamstrings, and quadriceps, as well as the inner and outer thighs.

Try this move: Sumo Squat With Cross-Chop

sumo-squat-with-cross-chop

How to do it:

  • Take a wide stance with your toes turned slightly out, holding dumbbells pressed together at chest level.
  • Lower down into a sumo squat, making sure those abs are engaged, weights hanging straight down in front of you.
  • As you push back up to standing, feel the inner thighs, glutes and core muscles working together to control the movement.
  • At the same time, bring the weights toward your chest with a bicep curl.
  • Rotate to your right: Keeping your wide stance and core engaged, feel your weight planted in the right foot and let the left foot pivot as your torso rotates to the right. You should feel as if this entire movement is driven by obliques.
  • Bring the weights down toward the ground in a controlled chopping motion, just behind your right hip. Squeeze your left glute as you chop.
  • Curl the weights back toward the chest as you rotate the torso back to your starting position.

Trick #4: Shift Your Weight

When performing squats, proper form should be in the forefront of your mind. Squatting with good form can make the difference between fast, safe, and great-looking results, and frustration (and sometimes even injury). To get the most benefit from your squat, always remember to shift your weight into your heels and slightly lift your toes off the floor.

Here’s how to do a perfect squat:

  1. To begin, grab a chair and position yourself in front of it.
  2. Sit down, just brushing your butt on the end of the chair and stand back up.
  3. Repeat and keep your knees and weight back
  4. The further and lower you get down in the squat, the more you’ll feel it in your butt.
  5. Click here for a video demonstration

Kathy Smith Squat and Reach

 How to do it:

  • Standing with feet hip-width apart, stabilize the midsection and imagine knitting the ribcage in by squeezing your abdominals throughout the movement. Squat down as if you’re going to sit in a chair behind you, sinking the hips back and keeping the knees parallel to the toes. With your weight in your heels, use your glutes and core to push you back up to standing.
  • As you stand, reach your arms up over your head and lift up on your toes.

Beginners:

  • Remember, your core is your center of gravity. By stabilizing your trunk muscles during the squat, you maintain your balance, preventing you from falling backward or forward. Start by mastering the form, slowly and purposefully, before adding toe lifts.

TRICK #5: Add Resistance!

One of the most basic ways to tighten your backside is by weight training. There are various ways to create resistance, one of the most familiar is with resistance bands, like ankle cuffs. Ankle cuffs help provide increased results in less time, and they can fit in your suitcase or underneath your desk.

Try this move to firm up your glutes and hamstrings:

Kathy Smith Hamstring Curls

How to do it:

  • Attach ankle cuffs to your legs and position one arm lightly onto a chair for balance
  • Lift your left leg behind you, heel pointed toward the ceiling.
  • Bring the leg back to center, trying to not let your foot touch the floor.
  • Repeat.
  • Remember to squeeze your glutes!
By Collage Video | | exercise, fitness, Kathy Smith, tips, Weekly Blog, wellness | 0 comments | Read more

Stay in Touch

Information

210 W. Parkway, Suite 7, Pompton Plains, NJ 07444 ● © Collage Video ● Exercise Video Specialists ● Fitness Videos and Workout Videos ● 1-800-819-7111 / 201-464-4921 ● CustomerCare@CollageVideo.com

From Our Blog

  • Collage welcomes instructors Brook Benten & Aimee Nicotera to the shop!

    Exciting news! We're welcoming two highly qualified instructors that will help you crush your fitness goals, shake up your routine, and offer a new source of motivation!   Brook Benten, B.S. in Exercise and Sport Science from Texas State University. Masters of... read more

  • Two More Happy Yoga DVDs Coming to Collage Video

    Happy Yoga from Sarah Starr is designed to bring you the beauty of Mother Nature as you receive yoga's rejuvenating benefits, including flexibility, toning, clarity and balance. Want to learn more about Sarah? Visit her instructor profile here. These titles... read more

  • What is Callanetics? Is it for me?

    Some people swear by it. Some people have never heard of it. It’s Callanetics. Callanetics became a revolutionary method of exercise and gained international recognition for its speedy body-shaping results. Some of the noise behind Callanetics may have softened over... read more