Angie's Corner

Posts in the goals category

Flexible Mind, Flexible Body

by Angie Miller

Angie MillerI see it all the time… It's the end of class, and just as I'm ready to finish with what I think is the best part of the workout, the ending stretch sequence, there's a few individuals who hustle out of the room as if those final 3-5 minutes are critical to their day. Maybe once in awhile that's true, but before you decide to skip the stretch at the end of your next workout, I think it's important to weigh the benefits of a 5 minute head start on errands, dinner, or whatever it may be, vs. the benefits of 5 minutes of proper stretching.


Know this… skipping the ending stretch after you've just sweated to your favorite exercise DVD, taken a run, or even a long walk, can cause muscle imbalances that result in injury, less effective movement patterns, and in my opinion a less productive workout overall. Just as a flexible mindset can help up to embrace concepts and ideas that are outside of our usual way of thinking, a flexible body can help us to embrace exercises and activities we might not otherwise be able to perform.

So the next time you're tempted to skimp on your stretch, here are three reasons to remain flexible:

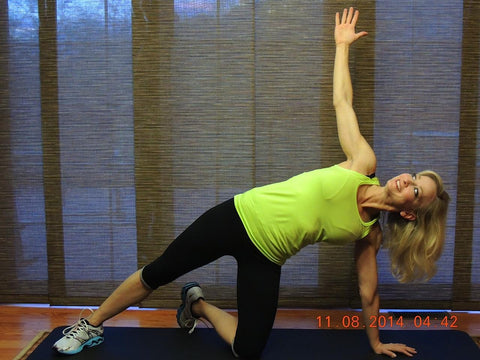
  1. Stretching improves mobility:

Your joints allow you to move. Whether it's reaching down to pick up your baby, or racing around your neighborhood on your morning jog, stretching helps you to maintain joint mobility. If your range of motion is limited because you have tight muscles, this will affect your workouts and your everyday movements.

  1. Stretching improves posture and balance:

Stretching can help you maintain a good balance of muscle strength and muscle flexibility, which is important for proper posture and alignment. A common imbalance for many of us is tight hip flexors, (front of the hips), from sitting down much of the day. This tightness can cause your lower back to sway as your pelvis is pulled forward. Any imbalance like this alters your posture and affects the quality of your movement, which can have a negative impact on your balance. The goal is to be able to move freely in your daily activity and to have proper range of motion as you exercise. Stretching will keep your joints mobile and improve your overall posture and body alignment.

  1. Stretching helps relax your muscles and relieve your stress:

After sitting at a desk in front of a computer all day, or sitting at an event for an extended period of time, doesn’t it feel amazing to stand up and stretch? When we sit in one position for too long, or work the same muscles over and over again, aka repetitive movement, our muscles get tight and knotted. Stress also has an impact, as it causes more tension throughout our body. Stretching can help counterbalance the stiffness and tension by increasing blood flow to the affected muscles and stimulating the nervous system to decrease stress hormones. All of this results in a calmer, more relaxed physical state.

When it comes to stretching, the term “use it or lose it” really does apply. Good body mechanics, improved range of motion, healthy posture and alignment, and better balance all result from proper stretching and flexibility.

Here’s to stretching your limits~

Best in Health,

Angie

Angie Miller, M.S., is a fitness educator, university instructor, and Licensed Professional Counselor who blends her skills and expertise to empower individuals, mentally and physically, and provide them the tools they need to succeed. A veteran group exercise instructor and personal trainer, Angie is the star of acclaimed exercise DVD’s, including the Bedroom Body™ workout. Her passion for progressive education brought her to Northern Illinois University, where she teaches in the Dept. of Kinesiology & Physical Education. Outside of the university, she presents at fitness conventions worldwide and leads industry trainings as an AFAA Certification Specialist and Kettlebell Concepts Master Instructor. Angie writes for fitness journals and digital communities, and blogs for Collage Video. Connect with Angie at: http://www.angiemillerfitness.com

Six Minute Total Body Kettlebell Workout

by Angie Miller

Angie Miller

Why train with kettlebells?

Kettlebells are one of the most versatile, time efficient training tools for all over body conditioning. They provide an excellent cardiovascular and strength-training workout that targets your core and improves your flexibility. Kettlebells deliver results; maximizing calorie expenditure and helping you redistribute your weight and lose inches.

Unlike traditional weight training, Kettlebell exercises focus on movement patterns vs. specific muscles. Their unique design allows the body to move through large ranges of motion. With a kettlebell, the weight is offset from the handle so the center of gravity is displaced. This trains the core, and makes the kettlebell more dynamic and challenging. Kettlebells can do anything a dumbbell can do, but not vice-versa.

Kettlebells are fun to work with, and we see and feel the results. Check out my tutorial below, which focuses on safety tips, alignment, and execution, then start swinging.

TUTORIAL:

Double Arm Swings- With this move you will send your hips back, load them up, and explode forward.  Begin by sitting back with the hips, knees slightly bent. Keep your chest open, and shoulders down and back. The weight is in your heels, rooted to the ground. Looking straight ahead, swing the kettlebell back between the legs, snap your hips, and stand up tall and strong. Lock out your knees and squeeze your glutes as you do this.  Don’t try to lift the bell with your arms, or “muscle the bell.”  All the power comes from your hips. Breathing is important here. Take a deep inhale in through the nose on the way down, and exhale as the kettlebell comes up.  You should not feel any pain in your lower back. If you do, check your form, and remember your breathing.

Windmills- Begin with a wide stance. The knee of the front leg may be slightly bent, and the foot will be turned out. The back leg should be straight. Stack your hips, one on top of the other, and lower the trunk toward the kettlebell as the hips flex, then extend and stand up tall. The Kettlebell arm remains upright and extended throughout the entire movement. Remember to look up at the bell. Initially, knees may be slightly bent, but as you become more flexible you may be able to accomplish this move without a bend in the knees. 

Cleans- Begin in rack position.  In the rack position your thumb should be able to touch your chest and your elbow should be snug against your abdomen.  As you let your arm come down, bend your knees, squat slightly, and let the bell hang as in the bottom position of a dead lift.  Point the thumb back, and as you stand up tall simulate zipping up your torso with the kettlebell.  Snap the hips and squeeze the gluts at the top, bringing the kettlebell back up into the rack position.  Picture a vertical line from your groin to your chest.  Hitting yourself in the shoulder or bicep with the kettlebell as you bring it up is an indication of improper form. Be patient and keep practicing.

Be sure to check back next week for more fitness tips and information, and feel free to reach out with any questions.

Best in Health

- Angie

Angie Miller, M.S., is a fitness educator, university instructor, and Licensed Professional Counselor who blends her skills and expertise to empower individuals, mentally and physically, and provide them the tools they need to succeed. A veteran group exercise instructor and personal trainer, Angie is the star of acclaimed exercise DVD’s, including the Bedroom Body™ workout. Her passion for progressive education brought her to Northern Illinois University, where she teaches in the Dept. of Kinesiology & Physical Education. Outside of the university, she presents at fitness conventions worldwide and leads industry trainings as an AFAA Certification Specialist and Kettlebell Concepts Master Instructor.  Angie writes for fitness journals and digital communities, and blogs for Collage Video. Connect with Angie at: http://www.angiemillerfitness.com


By Collage Video | | Angie Miller, exercise, fitness, goals, Motivation, Weekly Blog, Wellness | 0 comments | Read more

Tight Abs in 10 Minutes

by Angie Miller

When it comes to working out on a busy schedule, it's hard enough to fit in cardio, weights and stretching, much less spend more time trying to get enviably sculpted abs. With summer coming and swimsuit season around the corner, we’re all looking to tone up, trim down, and chisel our middle. Check out these four exercises from the Core & Pelvic Floor section of my Bedroom Body™ workout DVD, and you’ll be bikini ready in no time.


Full Workout Available Here!

10-Minute abs workout: For each exercise, a mat or towel is the only equipment needed. 

EXERCISE ONE: Oblique Crunch

Muscles worked: obliques, transverse abdominis (a deep abdominal muscle), glutes and adductors (inner thighs).

Start position: Start out on the mat on your side with your knees bent, placed slightly in front of your body. Keep your torso long and extended. Bend your bottom arm for support and place your elbow directly below your shoulder. Separate your knees into a clamshell position, placing the inside soles of your feet together. Bend your top arm at the elbow and rest your fingertips gently behind your ear. Engage your abdominals and lower back muscles.


Movement: Inhale first. As you exhale, lift your hips and bring your upper knee to your elbow, performing a side crunch. Focus on laterally flexing your spine and contracting through your obliques. Keep your torso strong and stable to avoid any extraneous upper-body movement and your head upright to avoid collapsing onto your shoulder.

Repetitions:

  • Perform one set of 16 repetitions, single counts.
  • Perform one set of 8 repetitions with pulses: up and pulse for three, lower down on four.
  • Switch sides and repeat.

Note: If this move is too challenging, keep your knees together rather than separating them into a clamshell position. Once you master the clamshell move, you can make the exercise more intense by placing a small ball between your upper thighs. As you lift, squeeze and engage your inner thighs. This will also work your hip adductors.

 EXERCISE TWO: Seated Clamshell Crunch

Muscles worked: rectus abdominis (the six-pack), adductors (inner thighs) and lower back.


Start position: Start in a seated position on your mat, facing front, with your knees bent and your hands on the floor behind your hips for support. Sit up tall with your torso long and extended, and your chest open. Keep the inside soles of your feet together and separate your knees. Lift your feet a few inches off the floor.

Movement: Inhale first. As you exhale, lift your legs and bring your knees toward your chest, performing an abdominal crunch. Focus on keeping your core strong and avoid collapsing through your torso or hiking up your shoulders. Think about driving your ribs into your hips as you exhale, engaging deep into your abdominals and lower back. Keep the movement isolated to your core and perform it slow and controlled.

Repetitions:

  • Perform one set of 16 repetitions, single counts.
  • Perform one set of 8 repetitions, with pulses: up and pulse for three, lower down on four.

 EXERCISE THREE: Side Plank with Arm Extension

Muscles worked: obliques, transverse abdominis (a deep abdominal muscle), gluteus medius and adductors (inner thighs).


Start position: Start out on the mat on your side with your torso long and extended and your legs straight, stacked on top of one another. Bend your bottom elbow and place it directly below your shoulder, keeping your neck long and making sure there is space between your ear and your shoulder. Keep your shoulders and hips facing forward, stacked on top of one another. Your upper arm will be bent, with your elbow by your waist.


Movement: Engage your abdominals and lower back as you lift your hips and knees off the floor, extending your upper arm above your head. Your bottom foot should stay in contact with the floor as you lift, and your head should stay in line with your spine. Pause at the top, then lower down slow and controlled, bringing your elbow back to your waist. To avoid overloading your shoulder, keep your neck long and focus on lifting and engaging through your center.

Repetitions:

Perform 8 to 12 repetitions on each side.

Note: To make this exercise easier, bend your knees to make a shorter lever and put less stress on your shoulder. Another modification is to place your upper arm on the floor in front of you for additional support.

EXERCISE FOUR: Hip Lifts with Torso Rotation

Muscles worked: abdominals, lower back, gluteals and arms.

Start position: Start out seated on the mat with your knees bent and your feet hip-distance apart. Hands are behind your hips, placed flat on the mat for support. Your torso should be long and extended, and your head in line with your spine.

Movement: Inhale first. As you exhale, lift your hips off the floor, rotating your torso and extending your right arm to your left leg, fingertips to toes. In the upper extended position, you are supported only by your left hand and your right foot. Your balance and control comes from engaging through your center and stabilizing through your spine. Lower and switch to the other side.

Repetitions:

  • Perform one set of 16 repetitions, alternating sides.
  • Perform one set of 8 repetitions, slow and controlled; hold for a few seconds at the top, increasing the balance challenge.

Note: If this is too challenging, keep your hips on the floor and rotate your torso, extending your fingertips to your toes, still working your core, but without the additional balance challenge.

Own this Workout on DVD!

Best to You in Health

Angie MillerAngie Miller is the star and creator of the Bedroom Body™ Workout and other top selling exercise DVD’s. Passionate about fitness and education, Angie teaches at Northern Illinois University and is a Certification Specialist for the Aerobic and Fitness Association of America (AFAA). She is a freelance writer, group fitness instructor, personal trainer, and proud mom. Learn more about Angie at: http://www.angiemillerfitness.com

Weightless Workout~ The Power of Bodyweight Training


by Angie Miller

Angie MillerAs bodyweight workouts rise in popularity, I often get asked about their effectiveness and their ability to deliver results. Personally, I think bodyweight training is the foundation of all training. Not only do I love the freedom and flexibility of weightless workouts, no equipment, no fuss, I love what they teach us about our body. When it’s just us against gravity we learn how to create resistance, and how to target every muscle group effectively simply by changing our body position. Bodyweight training teaches us how to manage and distribute our body weight, how to stabilize and strengthen our core, and how to use our gluteals for power and support. This gives us better body intuition that carries over into everything we do, in the gym and at home. Most importantly, without the added dimension of dumbbells, weighted bars, and other training tools, we can focus on proper form and technique, and just like dancers we can learn to move with grace and precision.

Here are of three of my favorite bodyweight exercises: All three exercises build upper body strength in your arms and shoulders, help you to stabilize and strengthen your core, improve your flexibility, and teach you to use your gluteals and legs for power and support.

1. Downward Facing Dog:

How to Do: Start in plank position with your body fully extended, hands directly below your shoulders, hips stable, and shoulders down and back. Engage your torso and lift your hips in the air, keeping your hands and feet in place so you stay long and extended.

Tip: Think about distributing your bodyweight so that your shoulders and wrists don’t feel any extra pressure. Engage through your center as if you’re wearing a belt. Lift your energy up through your spine and down the back of your legs, rooting into your heels.

Tip: Be sure to keep your neck long to avoid your shoulders sinking into your neck.


2. Side Plank:

How to Do: Start from front plank, then open up into a side plank, extending one arm up toward the ceiling.

Tip: Make sure that your support arm is directly below your shoulder. Be sure to keep your neck long and look up toward your extended arm. Stack your hips and shoulders, placing your body against an invisible wall behind you.

Tip: You can modify this exercise by bending your bottom leg and placing your knee on the floor. This helps take pressure off of your shoulders and wrists.


3. Tabletop:

How to Do: Start with your buttocks, feet, and hands on the floor, with fingertips facing your hips, feet are hip distance apart. Gently lift your hips and try to flatten your torso, engaging your center, pulling your chest open, and drawing your shoulder blades together.

Tip: Keep your head in line with your spine and don’t forget to breath. Really engage your gluteals here, using them for strength and support.

Tip: Tabletop opens your chest and strengthens your back, gluteals, and hamstrings, all three areas that are often overlooked and undertrained. This is great for your posture!


I hope you enjoy bodyweight training as much as I do. Here’s to good health, strong muscles, and amazing posture!

Sincerely,

Angie

Angie Miller is the star and creator of the Bedroom Body™ Workout and other top selling exercise DVD’s. Passionate about fitness and education, Angie teaches at Northern Illinois University and is a Certification Specialist for the Aerobic and Fitness Association of America (AFAA). She is a freelance writer, group fitness instructor, personal trainer, and proud mom. Learn more about Angie at: http://www.angiemillerfitness.com


By Collage Video | | Angie Miller, exercise, fitness, goals, Weekly Blog, wellness | 0 comments | Read more

Stay in Touch

Information

210 W. Parkway, Suite 7, Pompton Plains, NJ 07444 ● © Collage Video ● Exercise Video Specialists ● Fitness Videos and Workout Videos ● 1-800-819-7111 / 201-464-4921 ● CustomerCare@CollageVideo.com

From Our Blog

  • Collage welcomes instructors Brook Benten & Aimee Nicotera to the shop!

    Exciting news! We're welcoming two highly qualified instructors that will help you crush your fitness goals, shake up your routine, and offer a new source of motivation!   Brook Benten, B.S. in Exercise and Sport Science from Texas State University. Masters of... read more

  • Two More Happy Yoga DVDs Coming to Collage Video

    Happy Yoga from Sarah Starr is designed to bring you the beauty of Mother Nature as you receive yoga's rejuvenating benefits, including flexibility, toning, clarity and balance. Want to learn more about Sarah? Visit her instructor profile here. These titles... read more

  • What is Callanetics? Is it for me?

    Some people swear by it. Some people have never heard of it. It’s Callanetics. Callanetics became a revolutionary method of exercise and gained international recognition for its speedy body-shaping results. Some of the noise behind Callanetics may have softened over... read more