Flat Abs (1 Trick Your Routine Is Missing)
by Kathy Smith
You’ve heard by now that the path to flat abs isn’t through endless crunches. In fact, a study found that classic crunches aren’t even in the top 10 for most effective slim-belly exercises.
The secret fast-track of a flat belly is more simple than you may think. In fact, you can add it to any of the ab moves below to transform your routine. You can even practice this trick at the grocery store, or while you’re cooking. Ready to see what trick you’re missing?
The Trick You’re Missing – House For A Mouse
-
House For A Mouse:
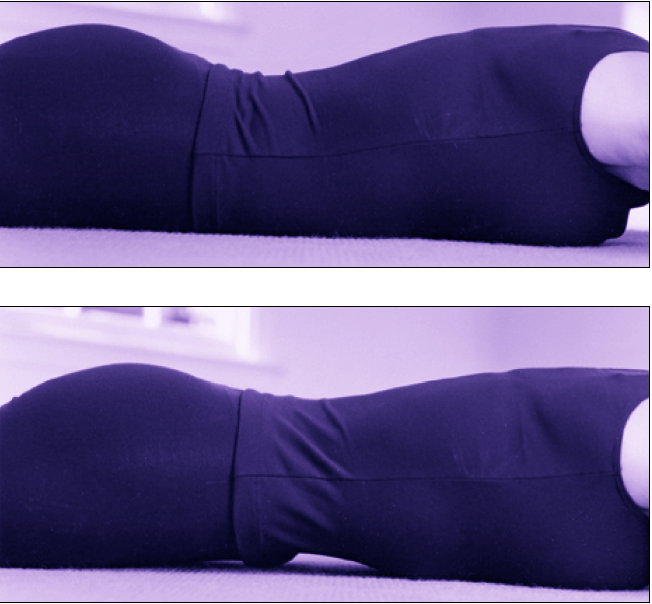
- Lying facedown on the floor, arms folded so that your forehead rests lightly on your hands.
- Pull your navel in so that it rises ever so slightly off the floor…As if you’re making a little “house for a mouse.”
- As you do this, make sure you keep your pubic bone and your lower ribs anchored on the floor.
- Beginners: If your abs don’t actually lift high enough to lift your belly up off the floor, that’s okay. You can still activate the muscles by bringing the belly button up and in, no matter how small the movement. You can also rest your upper body on your forearms, if it’s comfortable, so you can lift your belly further away from the floor.
-
Advanced Exercisers: Try adding a hyperextension to the move:
- Maintaining that house-for-a-mouse core engagement, lift your upper body up just enough so that your legs and pubic bone remain on the floor, but your torso hovers just a teeny bit in the air.
- Slowly lower back down, keeping the belly button pulled in nice and tight throughout the movement.
- Now do the same thing with the legs. Keep the torso resting on the floor (still holding that house-for-a-mouse) and lift the lower body slowly up off the floor, and slowly lower back down.
- Try 8 repetitions with the upper body lift, 8 with the lower body lift, and, if you’re feeling adventurous, try 8 reps lifting the upper and lower body simultaneously.
Add the House For Mouse motion to the three moves below to challenge your core with no equipment needed!
SIDE SWEEPERS
What it does:
- The Side Sweeper is a cornerstone of midsection stabilization, training you to engage your core muscles in a 360-degree way. This variation adds an additional “tuck” challenge for the core and glutes and can be modified easily for beginners.
How to do it:
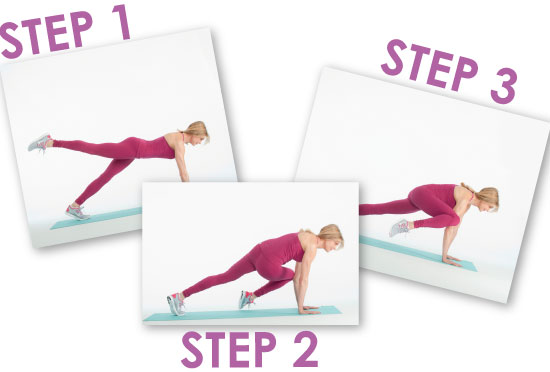
- Begin on your hands and knees. Align your wrists directly under your shoulders and your knees directly under your hips. Distribute your weight evenly across your hands. Reach your pelvis toward the ceiling and draw your sit-bones to the wall behind you.
- Gently begin to straighten your legs,bringing your body into the shape of an A. Imagine your hips and thighs being pulled toward the back.
- Lift your right leg leg straight in the air.
- Slide forward into plank position, with the shoulders over the wrists and with your leg still slightly lifted off the ground. Keep the abdominals drawn in tight toward the spine.
- Contract your abdominals as you draw the right knee toward the nose into “tuck” position.
- Return to the starting plank position and repeat on the other side.
Beginners:
- If a full plank is too challenging, practice the movement on the knees first. Once you build your strength and can do a full plank, you can work toward this exercise.
- Make sure the shoulders are over the wrist, neck is long, shoulders are down and pulled back. Hips, shoulders and ankles should be in a straight line. As you move through the exercise, don’t let the hips rise to the ceiling, but keep them in that neutral extended position.
- If you find this too much pressure on your shoulders, press back to downward dog without the leg lift.
Advanced:
- Instead of alternating knees quickly, try extending the hold when you’re in tuck position for up to 20 seconds.
CANNONBALL
What it does:
- This move is sometimes called the ˙banana,” because of the slightly-curved line your body forms at the start of the exercise. But no matter what you call it, this full-body core-strengthener is a surefire way to fire up the entire abdominal wall.
How to do it:
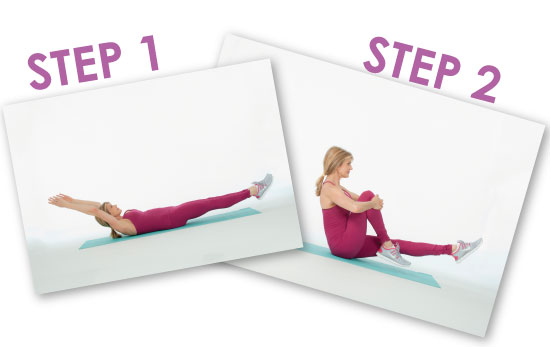
- Start lying on your back, with your arms reaching out overhead, legs lifted slightly off the floor, and toes pointed. Even here, at the start of the move, you’re activating core muscles by stretching them out. Keep pressing the lower back into the mat or floor to ensure the back doesn’t arch. If this feels like too much tension on the back, try lifting the legs a little further away from the floor.
- Imagine that, as you’re stretching the fingers and toes away from each other, the core is a strong magnet working to pull them back in. Using the force of that imaginary magnet, bring the knees in toward the chest. At the same time, reach your arms toward the legs.
Beginners:
- Start by doing this move just one leg at a time. Resting your left leg on the floor, perform the move as described above using only the right leg. Do 10 repetitions and repeat on the left side.
Advanced:
- At the top of the move, when you’re in ˙cannonball” position, wrap your arms around the shins. The objective is to find your balance point. To do that, you need to strongly engage your core muscles when you hit the top of the movement. Coordinating the arms and legs to hit that balance point is the challenge.
UP AND DOWN PLANK
What it does:
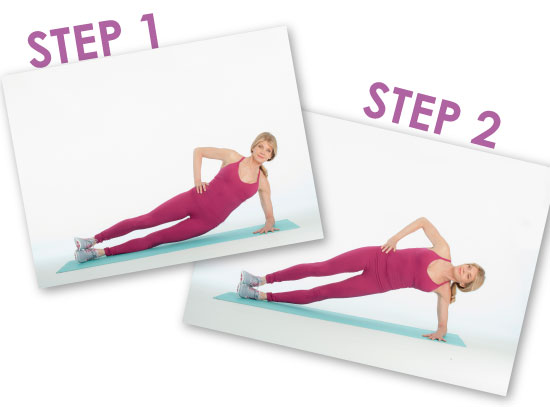
- The side plank exercise takes all of the midsection stabilizing efforts of the traditional plank, with an added emphasis on the obliques for extra muffintop-melting power.
How to do it:
- Position yourself on your side, feet stacked on top of each other, resting on your right elbow, with your shoulders, hips and ankles in one straight line.
- Activate your obliques by slowing lifting the hips up off the floor. Your range of motion will depend on your strength. Begin with a small motion and then start to increase your range of motion by concentrating on lifting not just your hips, but your rib cage off the floor.
- Slowly lower back down.
- Use your core strength to make sure your body stays in a straight line throughout the move, so your hips never jut forward or drift back. Keep your shoulders depressed, neck long and be sure not to sink into the shoulder as you lift your body.
Beginners:
- Try keeping your top hand on the floor for extra support.
Advanced:
- Once you’ve mastered this move on the elbow, you can graduate to an extended arm, resting your bottom hand on the floor and reaching your palm to the ceiling, increasing your range of motion.


Comments